I like to have lots of choice about which operating system I can boot to. Between my desktop PC’s two hard drives, I have at least three distributions of Linux and several versions of Windows, so I have complete OS flexibility.
Unfortunately, maintaining a multi-boot configuration like this can be a pain, especially if you later install an operating system which overwrites the GRUB boot loader you had in place (such as a version of Windows). If your boot loader is overwritten, you could be left with no choice but to boot the most recently installed OS.
In this tutorial, I will show you how to restore an overwritten copy of the GRUB boot loader by using a Linux live CD. In this example, my master GRUB installation is on a Kubuntu 8.10 installation, and I’m using an older Kubuntu 8.04 Live CD I have lying around.
This tutorial does require you to have some understanding of how your multi-boot system operates, disk partitions and using the command line. If you are not confident, perhaps find a friend who knows Linux more intimately to do this process.
Before Starting
It’s worth mentioning that you may need to use a live CD somewhat similar to that of your ‘master’ OS, where your boot loader configuration is stored. This is due to the technique we use to re-run the GRUB installer.
Also, you need to actually know which system holds the configuration file for your GRUB boot loader and on which partition it is located. If you have a more complicated multi-boot setup, like myself, you probably know this. If you have a more simple Windows-Linux dual boot, there should only be one Linux data partition where it could be.
Boot the Live CD
Start the Live CD up as normal. Don’t choose to install the OS if prompted, you want to come to a full live desktop to run the specific commands we need.
Identify your Partitions
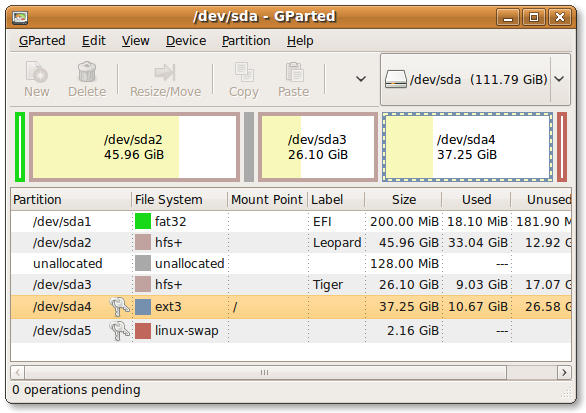
You need to know on which partition the GRUB config file and associated programs are stored. You may wish to use a graphical program such as Gparted (if available). You’ll want to find out the device string (such as sda5) of the relevant partition.

(The screenshot above is actually from my triple-boot MacBook, but still shows you how you can identify the (ext3) partition of Ubuntu on that system.)
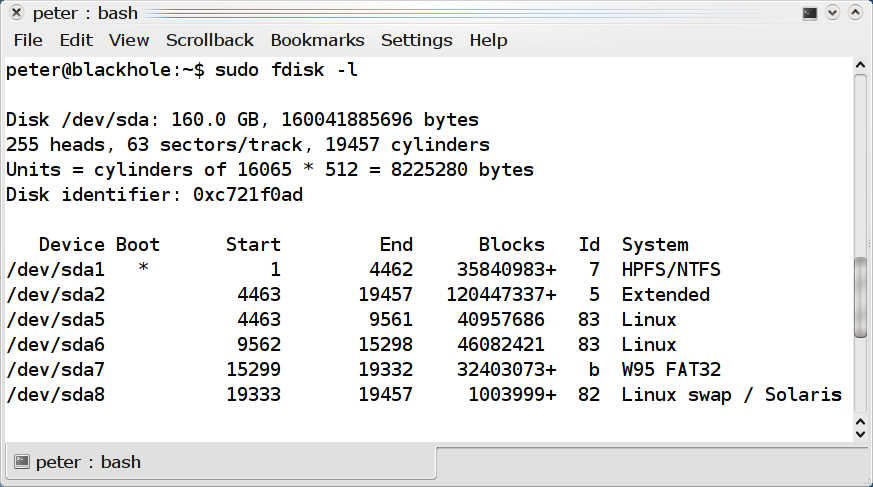
If you can’t use a graphical program to work this out, open a Terminal program and use the following command:
$ sudo fdisk -l
This will list all of the partitions on all the devices on your system. Under the ‘System’ column, you can see all of the partitions labelled as ‘Linux’. This won’t show you the difference between data and OS partitions, so is less useful in a more complex partition layout.

If you can work out where your Linux is from this, note down the information under ‘Device’.
Mount the Partition
We now must mount your partition, so that we can access it. Some Live CDs may do this for you, or offer to do so, but here we will perform the process manually.
We will first make a folder in which the partition is mounted and then do the mounting. Replace the device string /dev/sda5 with the device string that you identified earlier.
$ sudo mkdir /mnt/system<br />
$ sudo mount /dev/sda5 /mnt/system
You should now be able to browse your hard drive by navigating to that folder. The next process we are going to perform is to temporarily change the root directory of our terminal (chroot), so that we can run the GRUB installer directly from the hard drive. It won’t even realise it’s not running from the real system
On Ubuntu and other sudo-based distros, we must first do this:
$ sudo -i
to become root fully (sudo is not enough here).
Doing the chroot
The GRUB installer requires to read the devices on disk directly in order to write the GRUB boot record back onto the system properly. It therefore needs a working copy of /dev, inside the mounted directory.
# mount -o bind /dev /mnt/system/dev
Next, we can run chroot:
# chroot /mnt/system
From this point forward, be very careful. You have root privileges and full write access to your hard drive. The usual caveats apply.
Run the GRUB Installer
All we need to do now is to simply run the GRUB installer, which plonks the GRUB boot record back on the hard disk and gives us back all of our choices.
# grub-install /dev/sda
If you need to install GRUB elsewhere (such as a different disk or a specific partition), change /dev/sda. In most cases, just leave this as-is.

GRUB should be re-instated on disk. You can now simply close your terminal, reboot the machine safely and everything should be back to normal.