Squid is probably the world's most popular caching system and proxy server. In this tutorial, I'm going to be using it to set up a basic HTTP cache for a small local network. I'm going to use Fedora 8 for this tutorial, but these steps should work on most distributions with little modification.
Getting Squid
First things first, we need to download squid. I'm going to use the easiest method, and get it from yum. As root:
# yum install squid
Once that's downloaded and installed, you should have a copy of Squid. The rest of what we'll need to do, is basically just configuration in the squid.conf file. First, however, let's ask Squid to set up any directories and files it needs to run.
# squid -z
You should get output something like this:
2008/01/12 16:30:31| Creating Swap Directories
Configuring Squid
If you installed from the repositories, then you'll find Squid's main configuration file in /etc/squid/squid.conf. Open up that file now in your favourite text editor, and you'll need to be root to edit it.
Set the port
Out of the box, Squid will run on port 3128 for caching HTTP requests. In most cases, this default is fine and can be left, but there may be reasons you may want to change it. A common alternative port used is 8080.
To change the port, search for the line in squid.conf beginning with http_port and set it to what you want. For example:
http_port 8080
For my setup, I'm not going to touch the port settings.
Set up access control lists
Ideally, you want to restrict it so that only people that you want to be able to access the proxy server can. The easiest way to do this is by setting up an access control list for your network.
In my case, my local network, and the clients that I want to access the proxy server, are all in the IP range 192.168.1.0 to 192.168.1.255. Under the Access Controls section of the file, I'm going to put this:
acl lan src 192.168.1.0/24

http_access allow lan

http_access deny all
Let's take a look at that in more detail. The first line here is setting up an access control list (ACL), with the name lan. This ACL specifies that it applies to the whole network of 192.168.1.* (that /24 means a netmask of 255.255.255.0).
The next line says that HTTP access should be allowed for everything matching the lan ACL - i.e., what we just set up. The final line tells Squid to deny everyone else.
This way, I can restrict the use of the proxy server to just who I want. It's fairly simple now provided you know a little bit about your network, to set up more complex and granular controls about access to your cache using ACLs.
Please note that if you also want to use the proxy server on the same machine that it is running, you'll have to add another ACL allowing 127.0.0.1, or you'll be locked out.
Once you're done sorting out your configuration file (including any other options you might want to change), restart Squid:
# /etc/init.d/squid restart
Allow access to Squid through your firewall
Here on Fedora 8, I need to use system-config-securitylevel to alter the firewall settings to allow connections from the machines on my LAN in to get to Squid. As root:
# system-config-securitylevel
Go to Other Ports on the left hand side and choose Add. Either scroll down to 3128 - squid and click Add, or choose user defined and enter the port you chose, leaving TCP as the protocol.
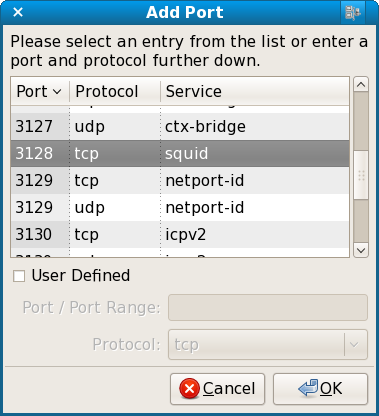
Once the exception is added, choose Apply to restart the firewall and you should now be able to get connections from outside your own machine.
Set up your browsers
Now, you need to go and set up your web browsers to actually make use of your proxy server. The process varies slightly from browser to browser, but here's how it is achieved in Firefox.
Go to Preferences, which is Edit > Preferences on Linux, Tools > Options on Windows and Firefox > Preferences on Mac OS X.
Click Advanced and go on to the Network tab.
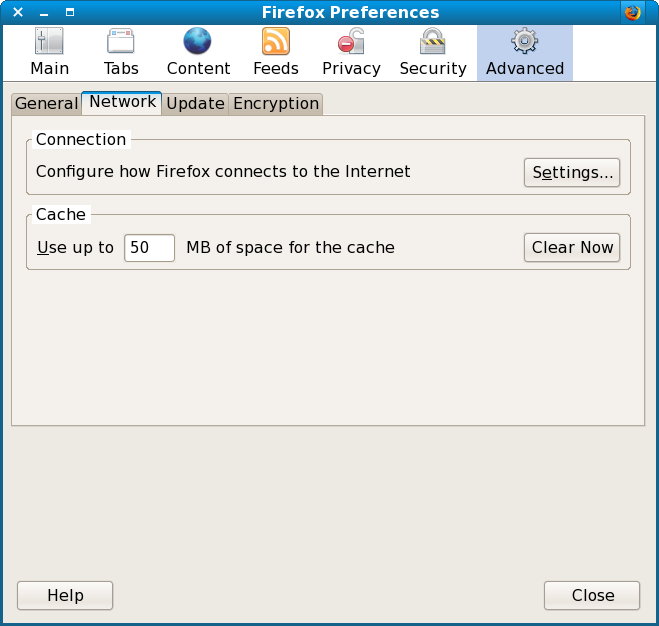
Under Connection, click Settings. Choose Manual Proxy Configuration, then enter the IP address and port of your proxy machine that you set up under HTTP proxy. OK everything, and you should be browsing with the aid of Squid. You'll need to repeat this process for each browser on each computer on your network that you want to make use of your cache.
And enjoy!
And that is it. You now have a fully-functioning, albeit pretty much a default installation of Squid. It is caching your web requests and, supposedly, speeding things up!
If you're running into problems, it might be worth double-checking your ACLs to see if you're accidentally denying yourself access. You can also troubleshoot any problems with your configuration file by going to the command line and running:
# squid -k parse
Any errors in the config file will be spit back out at you.
So, until next time, have fun with your new cache!
