
The Beryl Project is what gives us the ability to have beautiful 3D desktop effects on Linux. Actually, it's forked from Compiz, which can do many of the effects too, but at the present time Beryl has more customisability and features.
In this post, I'm going to show you how easy it is to configure your 3D effects to your liking, by using in the built-in graphical settings programs. I'm using Beryl 0.1.9999.2 on Fedora Core 6 (that's at the time of writing the latest build of Beryl in the Fedora repositories), but these steps should work in newer versions as they come out too.
I'm not going to go in-depth on what every option does - there are a myriad of plugins. Instead, I'll briefly walk you through the initially a bit dauting configuration GUI and then you can get tweaking!
Setting up Beryl
Unfortunately, initially setting Beryl up can be a bit tricky. Getting it up and running is a whole article in itself, but for reference you will need:
- A video card good enough to power the effects (anything from Geforce 3 era onwards should be fine).
- Correctly installed and configured 3D drivers for your card (from Nvidia, ATi or Intel).
- The beryl and emerald packages installed from your distro's software repository.
Check around on your favourite search engine, often you'll find a tutorial for your distribution on some forums somewhere. If you search for <your distro name> beryl tutorial, you should find some useful resources.
beryl-settings
Once Beryl is set up, you'll be given the default theme and settings. But default is boring, right? The program we can use to customise our desktop to our heart's content is called beryl-settings. Start it up by pressing Alt-F2, typing beryl-settings and pressing Enter.
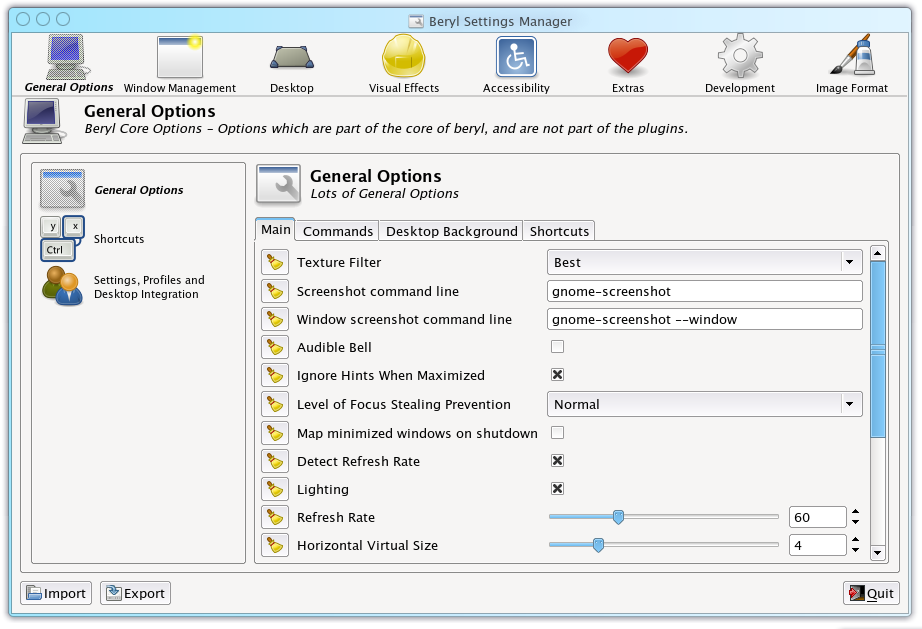
This is what the main interface looks like (click the screenshot to enlarge).
At the top we have our different categories of settings (General, Window Management etc.) On the left, we have a secondary set of buttons going vertically down (General Options, Shortcuts etc.). And finally, the tabs in the middle and slightly to the right.
It might look a bit confusing at first, but it's actually really easy to master. I'll give you a quick walkthrough of how to use the interface, so you can play around with the settings at your leisure.
Use the primary categories at the top to choose between different screens of settings. Once you've done that, you can click on an item on the left and then edit the settings for that item on the right.
If you click on Window Management at the top, you'll see on the left a list of the different plugins you can use on the left. In Beryl terms, a plugin is just a little add-on to Beryl that provides a certain effect. Use the tickboxes by each plugin to enable or disable it. For example, to enable the Scale plugin, make sure there is a tick to the left of it.

Once you've enabled something, you can click on it to display the preferences in the right-hand pane, where you can mess around with how it works. Let's take a look at Scale again.
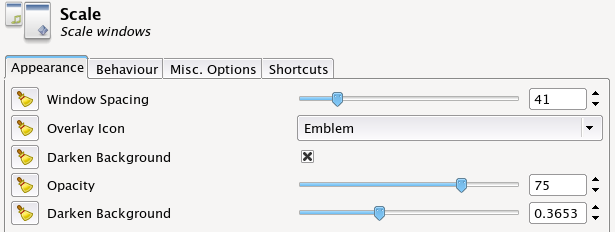
It's really easy here just to fiddle around with the settings to your liking. There's no Apply step, your settings get applied instantly.
It really is that easy to tweak and mess around. From now on, it should be fairly self explanatory to change your settings around, so have a play.
Importing and exporting settings
Once you've got your new 3D desktop looking great and how you like it, it's always a good idea to save out your settings so you can get them again if you reinstall your OS, or accidentally play a little bit too much and end up screwing up a setting pretty bad.
Click the Export button and the bottom of the beryl-settings window to export out a file with your settings. Hey, share it with the world so that they can get a replica of your 3D effects setup if you're feeling really nice!
Likewise, you can use Import to restore an exported settings file or to just import another lot of settings you've acquired from somewhere else.
If it all goes wrong
A word of warning - playing around with settings can be real fun, and you can easily set things to extreme values. If you end up accidentally being left with an unusable environment, you should do the following (hit Alt-F2, or enter into a terminal):
For KDE:
$ kwin --replace &
For GNOME:
$ metacity --replace &
That will temporarily turn off the effects, and you can hopefully return things to sensible values and fix the problem. That's why you should export your settings once you've got them set up how you want. That way, you can reload your settings to a known safe state and log out and log back in and have everything fine again.
Don't be deterred!
Despite that warning, don't be deterred from having a play. One of the great things about this technology is that it's so customisable. While OS X and Windows Vista might also have nice effects, there's only one place where you can truly customise things how you really want them to work, so enjoy that and make your desktop yours.
Coming in a future tutorial, I'm going to be looking at the Emerald Theme Manager, and how you can set themes, tweak them, download them, export, import and do just about anything with your window decorations - that's those things that border your windows and house the close/minimise/maximise buttons.
