Backing up generally isn’t a fun activity, but always proves to be worth it when that disaster you are not expecting happens.
Building a backup strategy can be a relatively complex process as well. What exactly should you back up, what format do you use, where do you store the backups? It can quickly become a task that demands quite a lot of technical expertise without the help of a program to make things relatively easy.
Back in Time is a solution for Linux, somewhat modelled on Apple’s Time Machine backup system for Mac OS X Leopard, but it also inspired by a few other Linux backup tools.
It has a nice GUI interface, supports automatic backups at time schedules you specify and keeps multiple snapshots of the whole backup, while only backing up the changed files each time. So, what is it like to actually use?
For the purposes of this review, I’ll be looking at the GNOME interface version, but much of this should follow the same for the KDE interface as well.
Setting Up
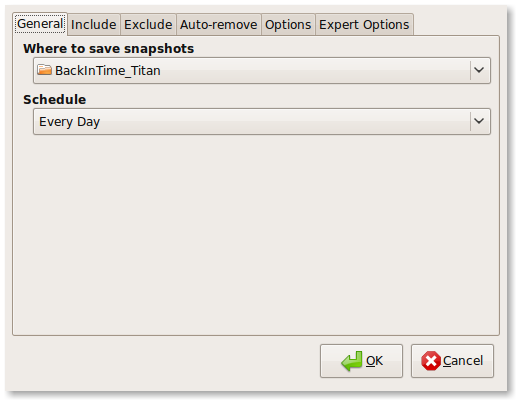
When you first launch the program, you are presented with the settings window. You do have to set up a location to back up to and which folders to include in the backup (the Include tab).

This does require you to have spent some time thinking about what you need to have backed up first, and the multiple tabs across the Settings window could be a bit intimidating for the new user.
If you are confident with what you want to set up, however, you can quickly set the base directory for your backups (which is probably on an external disk somewhere), the files you want to include in the backup and any advanced settings if you want.
It would be nice to have a couple of preset backup profiles for people who really just want to click one button and have their system backed up. For example, a preset which backs up your home directory to an external disk would be nice to have in a one-click configuration.
Despite the complexity of the settings window for new users, it is really quick and easy to get started.
Running a Backup
Supposedly the application will backup on an automatic basis, based on the schedule you set earlier. I have to admit, I don’t leave my backup drive plugged in all the time, nor do I have Back in Time open all the time, so I haven’t actually tried this out.
Doing a backup manually is a really easy process. In the Back in Time interface, you can simply press the large Backup Now button and it gets to work making a new snapshot.

Back in Time uses rsync underneath to backup only the files that have changed, but you don’t really need to care how it works. You press the button, it works out which files have changed, and makes a new snapshot on your backup disk. It really is effortlessly simple and I like it.
Restoring Files
What I really love is that Back in Time’s snapshots work just like a normal hierarchy of folders on your backup disk. Each snapshot appears just like a folder containing all the files you have chosen to backup, so even if you want to restore a file on another machine where you don’t have Back in Time, you just copy a file across. Again, it just works. (It uses hard links, so it only uses the minimum space
Of course, Back in Time allows you to restore from within the Back in Time interface, it is again really easy to do. All of your snapshots are listed across the left hand side and you can pick one, browse through the file system and bring a file back by clicking the Restore button.

Conclusion
Having played with this for a while, I’m really impressed. There are areas, particularly initial setup, that could be made a little bit easier for new users.
Apart from that, this is a really robust and effortlessly simple way to back up your home folder, for example. Its snapshot functionality works really well, meaning you can have as much or as little backward history of your system as you need, while also keeping a copy of the whole system.
I love the fact that it requires very little effort on my part to update my backup – I just plug in the drive, launch the app and click Backup Now.
I also find it very reassuring that the files aren’t in a weird format which has to be decompressed or manipulated by a program; they’re just files sitting there on the disk that I can access.
I’ve found Back in Time to be really useful as a backup solution for my home directory on this machine. It’s not powerful enough perhaps for some requirements, but if you are using Linux as an everyday desktop machine and have some files you need to get backed up, give Back in Time a try.