Installing Ubuntu (or any other Linux) on a Macintosh is a slightly different process than installing Ubuntu on a more traditional PC. Various differences in the hardware, particularly the use of the EFI firmware system, mean that some extra effort is required to get your favourite distro up and running on your favourite hardware.
This tutorial is inspired and somewhat derived from the Ubuntu Mactel Community Documentation, as well as my own experience of this process.
So let’s take a look at the steps involved, before we dive in.
Overview
We can divide the installation process into these major steps:
- Make free space
- Install rEFIt boot loader
- Run Ubuntu installer (setting GRUB boot loader location)
- Sync MBR with rEFIt
- Boot the system and uninstall rEFIt
I will be installing Ubuntu 8.10 on a late 2006 white MacBook, so this guide may be somewhat specific to the white MacBook, but should be fairly similar on most Intel Macs.
Why?
Because the MacBook is a really nice piece of hardware. Many bits and pieces of the MacBook hardware work out of the box, including:
- Graphics
- Intel GMA 950 and Intel GMA X1300 integrated graphics have open source drivers, so everything ‘just works’ out of the box, including desktop effects.
- The newer NVIDIA 9400M-based MacBooks will require the installation of the NVIDIA proprietary driver for full graphics support.
- WiFi
- Support for the WiFi chip used in the MacBook is built right into recent revisions of the Linux kernel. The result? WiFi ‘just works’. Seriously.
- Bluetooth
- Audio
- After a little fiddle with the audio volume levels.
Backup, Backup, Backup
Before you do anything, make a full backup of your system. Anything you care about must be kept somewhere else as well, just in case this process goes wrong. A Time Machine backup should be fine, as long as you don’t forget to also backup the exceptions to your Time Machine backup separately if you don’t want to lose them.
Once you are completely confident that you could restore the entire system in a snap, or are convinced that you don’t care about anything on the machine, go ahead and continue with this tutorial.
Make Free Space
The first step is to make enough free space on your disk for Ubuntu to exist within. There are essentially two ways to achieve this. Unless you’re reinstalling Mac OS X from scratch anyway, it is probably a better idea to use the Boot Camp method, as you don’t have to delete everything to do so.
Using Boot Camp Assistant

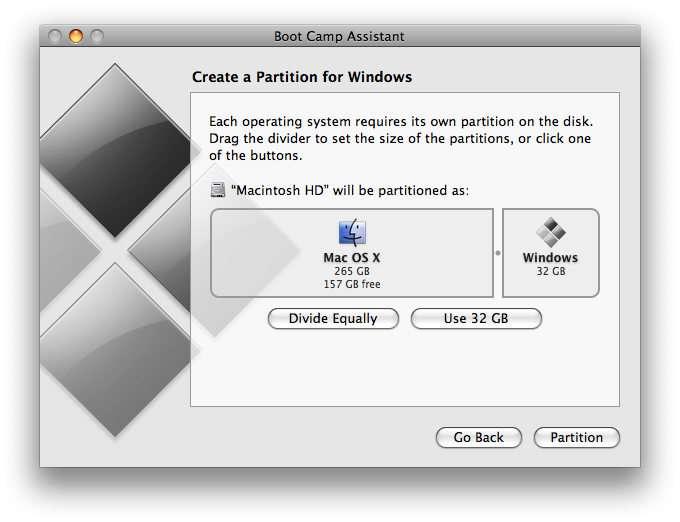
Despite being designed for dual booting Windows and Mac OS X, Boot Camp Assistant is very useful to us as it automatically repartitions the hard drive on the fly, without deleting any of your data.
The space that you allocate to ‘Windows’ in this screen will, obviously, be the space that Ubuntu will occupy, so give yourself as much space as you think you will need.
Once you’ve clicked Partition, simply choose Quit and Install Later, as we won’t actually be installing Windows.
Now Boot Camp Assistant very helpfully formatted the partition as FAT32. Um, great, but we actually want free space. We’ll fix this from the Ubuntu side later.
By Reinstalling
If you happen to be reinstalling OS X anyway, you can use Disk Utility from within the Mac OS X Installer (in the Utilities menu) to partition the disk, manually creating a Mac OS Extended partition for OS X and deliberately leaving some space as unformatted.
Install rEFIt Boot Loader
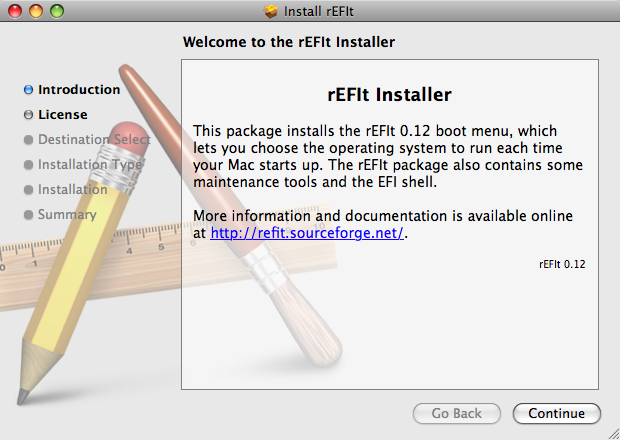
In order to fix the system’s Master Boot Record (MBR) after the Ubuntu install is complete, we need to briefly install rEFIt, a custom bootloader for EFI-based computers, including Intel Macs.
Go ahead and download the Mac disk image and run the installer package.

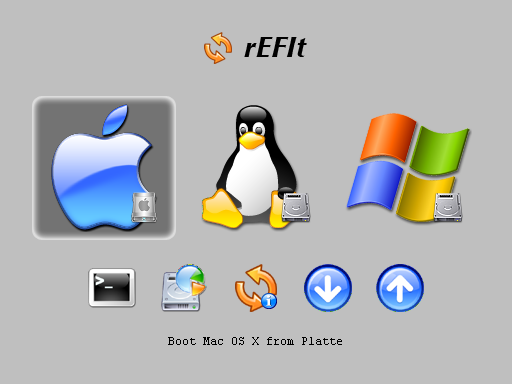
Once it is complete, reboot the Mac and verify that you get a screen that looks something like the following (it won’t have a Tux icon yet and shouldn’t have a Windows icon either).

OK, we’re finally ready to kick off the Ubuntu install.
Run Ubuntu Installer
For the most part, this process is exactly the same as you would do on a PC. There are, however, two crucial steps you must get right.
Before getting started on the install, however, we need to get rid of the FAT32 formatting of the Boot Camp partition. Pop the Ubuntu CD into your computer and reboot. At the rEFIt boot menu, you can choose to boot Linux from CD. I recommend you plug in a USB mouse at this point so you can right-click.
Select Try Ubuntu without any change to your computer to get into the full Ubuntu interface. Once the system boots, go to Applications > Accessories > Terminal.
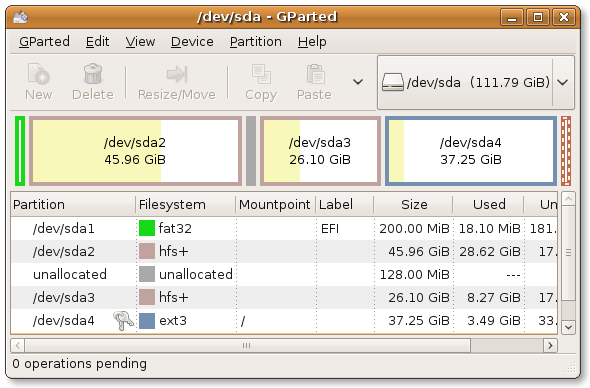
$ sudo gparted
This opens the partition editor, so we can go ahead and wipe that partition.

You’ll want to find the FAT32 partition labelled ‘Boot Camp’ (NOT the one labelled ‘EFI’ at the start), right-click it and choose Delete. Apply the changes.
Once the changes are applied, you can continue with the installation, as normal, except the following two things which must be set correctly:
Choose ‘Largest Continuous Free Space’
When you are asked by the installer how you want to partition the disk, choose Guided – use largest continuous free space. Since you just made sure you have a large chunk of free space earlier, by deleting the Boot Camp FAT32 partition, it will recognise that and use the space for Ubuntu.
If you are desperate to partition it yourself and know what you are doing, just make sure the bootable partition is the first one. Don’t put your swap before your data on the disk, or the Mac will try to boot from the swap partition.
Install GRUB on sda
At the final page of the installer, ‘Ready to install’, where you are shown all the settings for the install, make sure you click the Advanced button and choose to install GRUB onto /dev/sda3.
Sync MBR with rEFIt
So, the installation should finish and you will be told to reboot. When the system comes back up, do not jump straight away into the new Linux option on your rEFIt boot menu.

Instead, select the Partition Tool icon. It should tell you that the Master Boot Record need to be synced and offer to do so. Press the Y key to accept this and you will return to the boot screen.
I recommend at this point you select the option to shut down your Mac, give it a few seconds to clear everything out and then turn it back on. This avoids a lockup I experienced right after you perform the MBR sync.
Boot the System and Uninstall rEFIt
At this point, you should be ready to go. At the rEFIt boot menu, choose the Linux option and Ubuntu should boot. At this point, everything should be just the same as it would be on a PC.
You can now uninstall rEFIt if you desire, or you can leave it intact and use it each time the system boots to choose your operating system. The choice is entirely up to you.
If you remove it, you can boot into Ubuntu with the Mac’s native boot loader by holding down the Option key at startup and choosing the disk entitled ‘Windows’.
Conclusion
And that’s it. After you’ve done this little bit of fiddling to get it installed, and perhaps once you have configured some components that don’t work out of the box, you have a very nice little Ubuntu machine.