Keeping information safe and away from eyes that shouldn't see it can be pretty important. Here in the UK we've had several instances where the government has lost personal information. Since that information wasn't encrypted, it could be in anyone's hands by now.
One of the most popular ways to encrypt information is using the free GNU Privacy Guard software. In this short tutorial, I'll show you how to get up and running to use GPG to encrypt and decrypt some information. For now, I'm only going to cover encrypting information that only you want to get access to later, but I may follow up with how to transfer information securely to others in a future tutorial.
In this tutorial, I'll be trying to keep things as cross-platform as possible, so this guide should be easy to follow on Windows, Linux/Unix and Mac OS X. At FOSSwire we want to try and reach out and help users of non-Linux/BSD platforms to use free software too. Let us know how you think this tutorial works to achieve that and any thoughts on this issue in the comments of this post, or you can email me - peter@ this domain.
This will all be done on the command line, regardless of your operating system, but I'll show you more on how to get into that in a moment, once we are installed and ready.
Installation
First things first, install GNU Privacy Guard.
Linux/Unix
Most Linux users should already have this installed, if not then use Add/Remove Applications (or similar) and search for gpg or gnupg.
Each time you need to use GPG, open a Terminal program (it might also be called Konsole).
Mac OS X
Pre-built GPG packages are available from the Mac GNU Privacy Guard site. Download and install a package appropriate to your setup.
Each time you want to use GPG, you'll need to open Terminal, from /Applications/Utilities. Type the commands in this tutorial into Terminal to use the program.
Windows
A Windows version is available on the official download page. It is slightly difficult to spot, so here's a direct link to the current version at the time of writing.
Once you're installed, you'll need to open Command Prompt, from Accessories. Then type:
cd "C:\Program files\GNU\GnuPG"
That will allow you to follow the commands in this tutorial. Replace that path if you install GPG somewhere else, and remember that this will need to be typed in each time you load up Command Prompt afresh to use the program.
Setting up GPG
Once you have the software installed and your command line terminal open, let's get started.
The first thing you have to do in order to use the application is to create a set of keys. These keys are used to encrypt and decrypt information and they keep your data safe. Your keys are also protected by a passphrase that you must type in to use them (so that even if you lose your key and someone else gets a hold of it, it won't be any use without the passphrase as well).
gpg --gen-key
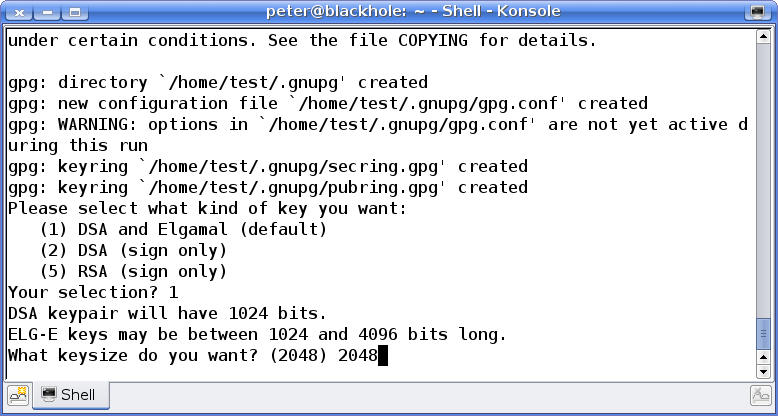
You'll see a load of weird messages, but you can just ignore most of them. The important question here is the kind of key you want. For now, we want to stick with choice 1.
Just type 1 and press Enter.
The next question you get asks you about key length. Just accept the default and press Enter here.

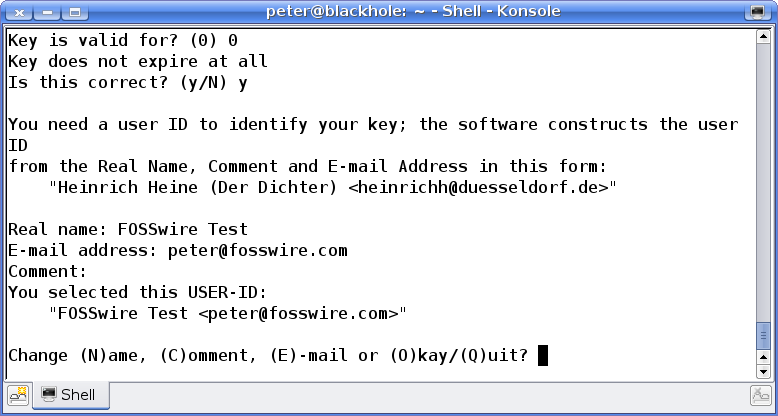
Next up, expiry. GPG keys are designed so that it is possible after a period of time to force your key to expire, for security reasons. For this tutorial, I'm not planning to distribute this key, so I'm going to choose 0, for key does not expire.
The penultimate set of questions ask you for some information to identify this key - your name and an optional comment. Once you've entered and are happy with that info, type O and press Enter to move on.

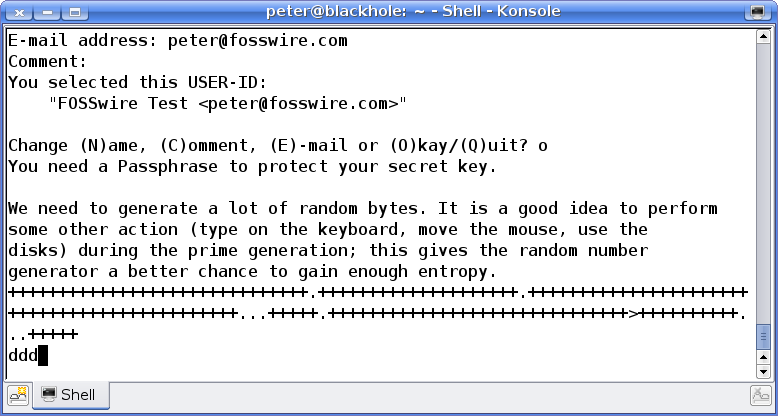
Finally, type a passphrase. This should be something secure and that isn't used elsewhere. The entire security of your encrypted data basically depends upon this being unguessable.
Note the emphasis on passphrase, this needn't and shouldn't be just a single word that is in the dictionary.
When typing in your passphrase, you won't be shown the typing in the terminal. This can be confusing if you haven't experienced this behaviour before. Don't worry - it is typing in properly, it just isn't letting you see it.
Once you've set the passphrase, GNU Privacy Guard goes off and creates your key. This will take some time, depending on how fast your machine is.

Once it's finished, you'll be sent back to the prompt. Now you have a key, let's encrypt and decrypt something!
Encrypting a File
So, how do we go about encrypting a file, so we can securely store it and decrypt it ourselves later?
Assuming you've still got that terminal window open from before, here's the command you need:
gpg --encrypt --recipient 'Name' "file"
Name - needs to be set to the name you gave in your key. This will allow you to decrypt it again later.
file - the path to the file you want to encrypt.
Once you've hit Enter to run that, your file will be encrypted. In the same folder as the original, there will be an encrypted copy with a .gpg extension.
Decrypting a File
OK, so now you need to get that same file back and read it. You securely erased the original, so you need to decrypt that version to get access to the data again.
The command you need is:
gpg --output "outputfile" --decrypt "file.gpg"
outputfile - the path to the file you want to put the decrypted contents in.
file - the path to the original, encrypted file you want to decrypt.
When you decrypt a file, you'll be asked to enter that passphrase. Type it in, and outputfile should now be the original file, just as it was.
Wrap Up
We have literally just scratched the surface here. GNU Privacy Guard is an incredibly powerful solution for all sorts of encryption and data security problems and this is just a limited scenario and light introduction into it.
This tutorial showed you how to use the command line program, however many of you may be more familiar and happier using a graphical program. There is a list of graphical frontends which does show you a few of these programs which might make using GPG a lot easier.
However, having an understanding on how to use the command line interface never hurts, and allows you to transfer those skills over to any platform.
Remember! Let us know how you think this tutorial works in branching FOSSwire out to support users of FOSS on other, non-Linux platforms.
Also, feel free to share any thoughts on the issue of cross-platform support. You can leave a comment below.